Category Indoor Hobbies

5 Simple Astral Projection Tips That Really Work

Implement these simple astral projection tips to increase your chances of a successful visit to the plane.

If you have arrived here you’re probably struggling to have success in astral projection. The following astral projection tips can be applied to make the process more simple and increase the likelihood of you visiting the astral plane.

It is recommended that as a beginner you should first do your research and these beginners astral projection tips should only be applied once you have more knowledge.

Take a look at our beginners guide to astral projection before you apply these simple tips. Or check out this fantastic book.

Get comfortable

Before you try Astral projection you should get as comfortable as possible and clear your mind. Using a pillow or blanket is recommended this will help you become comfortable and less distracted. 

Ensure you can breathe comfortably.

Let go of fear

The number one thing that will stop you from being able to successfully astrally project is your fear. Fear WILL hold you back. Your fears are irrational, bare that in mind and you do not have anything to worry about.

One of our main fears when starting out with astral projection is fear of the silver chord breaking. Or possession. 

You can rest assured that the silver chord will not break providing you do not stay too long in the astral plane. It is stronger than you think. 

It is paramount that you remain relaxed, calm and at all times in a positive mindset. Some people like to meditate beforehand and even take up yoga.

Lucid Dreaming and Astral Projection

There’s a big difference between Lucid dreaming and astral projection, it will serve you well to always remember this as a beginner. Dreaming is dreaming and projecting is projecting. Once you successfully visit the astral plane you will quickly realise there is a huge difference between the two. 

Astral projection is far too vivid to be considered a dream.

Binaural Beats and Isochronic Tones

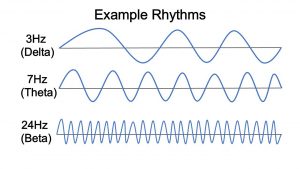
Another good astral projection tip for beginners is to listen to binaural beats and isochronic tones. This will help you reach the state of required relaxation. Again relaxation is paramount.

Binaural beats are tuned in with your brain waves and really do help.

Remember your experiences

Before you leave the plane and your astral body returns to your physical body, try your hardest to remember your experiences.

Write them down in a book afterwards, this will help you in the future and make astral projection more simple. You can refer to the book before the next time you visit the plane.

*BONUS TIP* How to visit someone on the astral plane

If you want to visit someone in your astral projection there are numerous things you can do to help. Spray the room with a fragrance that reminds you of them, focus on a photo of them for a while beforehand. Find an object of theirs and hold it in your hands.

Find a way to have that person in mind before you set out to the astral plane. It’s a good idea to ask their permission first, this will stop any resistance.

Astral Projection Tips Summary

Astral projection really does require focus and a positive state of mind. Along with relaxation and tranquillity. Before you even attempt it you should ensure that you have achieved all of these states.

Have you managed to reach the astral plane? What helped you get there? If you have any good beginners astral projection tips then please leave them in the comments below to help our readers. We may add them to the list. 

If you’re interested in mastering the art of astral projection then we can highly recommend you take the online course offered by Astral HQ – Check it out here.

10 Of The Best Singing Tips For Beginners

Follow these simple beginners singing tips to increase your vocal range and improve your singing voice.

When singing there are many things you can do to improve how you sound and your vocal range. 

These beginners singing tips will also protect your voice against fatigue and help prevent you from burning your voice out. 

I know that when I was singing in Spain and doing a lot of entertainment and karaoke hosting my voice became tired. I would sometimes do 5 nights a week and because it was one big party at the time I barely slept. This led to some very embarrassing and awkward singing moments. 

There of course many tips that a professional vocal coach, in depth online singing course or book will be able to provide you with. The following tips are just a few of the more popular and effective ones. 

Beginners Singing Tips

1. Stay Hydrated

Water, oh water. The magical elixir of life. One of my favorite beginners singing tips. Hydration is a huge part of your ability to reach certain notes or even sing at all. So let’s look at your vocal cords (folds) and singing voice as an engine. An engine does not work well without oil right? 

Your vocal chords are similar in a sense that they need to be hydrated and lubricated. Drinking room temperature water is one of the most important practices to keep your voice well maintained. When I say drinking water, I don’t just mean while performing or during practice, I mean all the time! 

To begin with you’ll probably be needing the toilet regularly but this will pass in time as your body becomes used to it. Try to drink between 8 – 10 glasses of water a day (8oz glasses)

I couldn’t stress this singing tip more. You’ll not only notice your voice and range improve but your whole health and wellbeing too. You skin, your hair and nails, your complex and you’ll have heaps more energy.

2. Rest & Sleep

Another important regime to follow is to ensure you get plenty of rest and more importantly sleep. Sleep is magical. As your body becomes tired so does your voice and sleep helps to heal our vocal chords and muscles. 

Sleep deprivation will effect singers in many ways for example lack of energy can reduce the energy we need for optimal breathing and in turn causes vocal fatigue. 

A good practice is to get between 7 – 9 hours of sleep a night. If you can’t hit this amount of hours or you’ve been deprived of sleep before singing, then you should talk as little as possible to rest your voice.

3. Exercise

Not only is exercise physically good for us in general it really can help with your singing. 

While exercising you are working out your cardiovascular system and your breathing. In turn this engages the diaphragm. 

A good exercise regime will increase your stamina and boost endorphins. 

If you stick to working out you will notice that you will be able to reach higher notes without straining and you’ll feel more energy, in turn more effort and emotion will go into your singing voice.

Some good exercises are walking, jogging, running, swimming and aerobics classes, anything that gives you a cardiovascular workout. Work out those lungs!

Try to exercise for at least half an hour daily to improve your singing voice..

4. Stretch your body

Stretch! Stretch everything. Stretch your face , your mouth, your legs, your arms, your body and all of your muscles!

It’s a lot more effective than you may imagine. 

Stretching gets rid of stress and tension in the muscles and body which can dramatically decrease your performance standards. Here’s some good stretching exercises for singers.

5. Sing in the Shower

Who doesn’t love a good sing song in the shower? I know I do, the neighbours also know I do!

What you probably didn’t realise is this is a fantastic place to warm up your voice.

The acoustics are often better in the shower and the steam moisturises your throat and vocal chords and in turn relaxes everything.

So sing in the shower while the bathroom is full of steam.

6. Breathing Warm Up Routine

One of the most if not most important parts of singing is your breathing, so as an athlete would warm up before competing in an athletic event, a singer should warm up.

Not just the vocal cords but your breathing too. You’re going to want to activate your diaphragm. This will help increase your vocal range and prevent unnecessary strain and fatigue on your vocals. 

Check out these beginners breathing exercises for singers.

7. Do not overreach.

Believe it or not sometimes too much practice is a bad thing. It’s also common for people to perhaps spend too much time warming..

Practice sessions should only last around 30 – 45 minutes with an adequate 5 minute warm up beforehand.

Start by singing easier to reach songs that are less demanding on your voice, build your way up to the more demanding parts of the song and then when it’s coming to an end try to warm down again. 

Some like to hum also at the end of practice.

Here’s a good 5 minute YouTube Warm Up.

8. Ask your friends & family

The best audience to practice in front of are your friends and family. Ask them to be honest with you and for constructive criticism and don’t be upset if you hear something you don’t like. 

Take all the advice and criticism on board and work to improve on these areas.

You can’t get better advice than a vocal coach. If you can afford to have lessons then I highly encourage this, your vocal coach will be able to identify the areas that need work and give you the specific exercises to help you improve.

9. Record yourself

There’s no better way of hearing what you really sound like than recording yourself. This way you can play it back and listen to the exact areas that you need improvement.

Your phone will suffice if you have no equipment, try to find a room with good acoustics. I find the bathroom has the best acoustics in my house. 

Setting up a small recording area in your home is not as expensive as you may think. A good basic setup on a budget can be found here.

Some great recording equipment can be found here.

10. Sing your heart out!

Emphasis, effort and passion are three things you need to put into your singing.

Feel the song, connect with it, throw all of your heart and soul into it. Believe it or not your facial expressions can change the way you sound, don’t be scared of looking silly.

Raw emotion and connecting with the song can drastically improve your sound, don’t overthink it all though, stay natural and relax.

Move around naturally, let the music guide you.

Singing Tips Summary

As I’ve previously said there are many beginners singing tips out there and these are in my opinion some of the most effective ones. 

Nothing will help you more than a vocal coach or singing tuition. If you can find the budget I would highly recommend it. 

I’m not a professional. The tips and Singing Guide For Beginners I write are all based on my own personal experiences. 

If you have any great singing tips for beginners, to add to this list then please use the comment area below to let us know about it. 

A Beginners Guide To Crystal Healing & Crystals

Crystals & Healing

What are Crystals?

They come in many shapes and sizes and in the practice of crystal healing have different properties and uses.

Crystals are natural minerals that the earth forms beneath the ground over thousands of years.

What is Crystal Healing?

Many believe that Crystals are an effective form of healing.

Classed as an alternative medical technique, but is not popular with traditional doctors and medical practitioners.

Crystal Healing is a holistic energy-based healing treatment that can treat many forms of illness and problems by healing their energy system. If performed correctly it can be very relaxing and tranquil.

Although there is absolutely no scientific evidence to support that claim that crystals can heal, it is still practised largely all over the world with many strongly believing in the healing properties of the crystals.

How does Crystal healing work?

It is believed that specific crystals and gemstones have properties that can help facilitate healing using the positive energy from the stones.

During a typical Crystal healing session, crystals or gemstones are aligned on the body at different “chakra points” these are usually placed near the head, on the forehead, throat, chest, gut and on the genital area.

Different stones and placements will be used for different disease and illnesses that the patient may suffer with.

Along with the above mentioned treatments at a Crystal healers it can be practised by anybody from the comfort of their own home, and home crystal healing is becoming more and more popular.

Some wear crystals on the body or sleep with them close-by or beneath their pillow to promote mental and physical healing.

Scientifically how does Crystal healing work?

There is no real scientific evidence to support that Crystal healing works, however scientific studies have shown that a positive “placebo” effect can occur.

Although no scientific evidence is present to support the belief many have experienced positive results and believe that it is a powerful alternative medicinal healing therapy.

Crystal healing is practised by a large number of people worldwide and has been for thousands of years so in my opinion “the proof is in the pudding”

Crystal Healing History

Evidence suggests that the first ever historical references for crystal healing was from the ancient Sumerians, they used Crystals in magic formulas. This was nearly 6000 years ago.

The ancient Egyptians also used crystals to ward off negative energy and disease.

Today the practise of Crystal healing is largely based on Asian cultures.

Mainly based on the Chinese life-energy concept, chi and the Buddhist or Hindu practice of Chakras. Chakras are believed by the Chinese to connect physical and supernatural “energy” elements of the human body.

Read more about the history of Crystal healing.

What things will I need to practice crystal healing?

The hobby is very inexpensive and to be honest there isn’t really that much that you will need to get yourself started.

Firstly I would recommend an in depth crystal book in which you can refer to while studying and practicing.

There’s a wonderful reference book wrote by Karen Frazier, it includes over 200 remedies for the mind, soul and heart you can buy it here.

You will of course need crystals or a crystal, you can buy them online here.

Perhaps a crystal wand, a very popular choice is found here.

If you wanted to be more serious about it you can take many online courses here.

That’s about all really to get started, you can grow your crystal collection as time goes on.

A very inexpensive hobby to get into.

An introduction to Crystals

As a beginner delving into the world of crystals and crystal healing can feel a little overwhelming, with hundreds of types of crystals in all shapes and sizes, where do you actually begin?

Before even thinking about starting you need to learn to trust your inner conscience and spirit. This is what guides us to the right crystals for the right purpose.

Let’s begin the learning process with learning more about the most common types of crystals and the basics of how to use them.

Crystal Shapes

In this part of the beginners guide I will list a few of the basic crystal shapes, there are many more.

These are just a few of the more common crystals you will need as a beginner.

Sphere

Also commonly known as a Crystal ball, not the type you look into though. These crystals are cut and polished into a perfectly round sphere shape. The sphere shape crystal will radiate energy evenly in each direction.

Because of the spherical shape they are connected to the earth, moon and other planets.

They are generally used for slowing down or even neutralising negative and unbalanced energies.

Crystal Spheres can be held over Chakras or passed through the aura.

In home use a sphere will need a stand for display and can bring a harmonious and peaceful energy to the home.

Placing a Crystal Sphere in the middle of a Crystal grid will promote protection, healing, peace and psychic development.

Pyramid

Pyramid Crystals can direct and anchor energy.

A largely popular choice for home Crystal healing, the pyramid shaped crystal can stabilise earth energies and enhance and project from the apex.

Smaller Pyramid shaped crystals can be placed along Chakras to balance.

In Crystal Grids, the pyramid crystal can be used to protect a specific person, raise vibrations and amplify your healing intentions.

Tumble Stone

The most common of crystal shapes, the tumble stone is also known as “tumbled stone”

Small crystals and stones are tumble polished to create a shiny and smooth surface on the crystal.

The Tumble stone crystals are usually smaller stones, but they are available in large sizes too.

An all purpose Crystal stone, radiating energies in all directions these stones are so versatile that they are generally carried around on your person.

They can also be placed on the chakras, worn directly on the body, placed in vases and bowls around the home and are one of the most popular choices for the Crystal grids.

Heart

Heart shape crystals/gemstones represent compassion and also composure.

They can be used to work on the healing chakra, this can be located in your chest.

Heart shaped crystals and stones work in a similar way to palm stones, they are used as support stones that you can hold onto when you are in need of strength.

They also work well if you are in fear, they help to calm you.

Heart shaped stones give out “good vibes”

Cluster

Clusters are a bunch which are naturally grown.

Cluster crystals contain amplified energies and are the premium group.

You will find that they are often used in grids (more about these below) chakra training, communication with spirits and for astral projection.

These cluster crystals can be used to raise the harmony of a space.

Natural Point

Natural Point stones are a natural shape, they are rare to find.

These crystals can help you to absorb “chakra” and dispel the energy.

Often used in pendulums, wands, for healing and feng shui.

Palm

Palm shaped crystals/stones are flat in shape and are made from tumbled stones.

They are easy to carry with you as they fit nicely into the palm of your hand. (hence the name)

You can use palm stones for many different crystal therapies, meditating and for feng shui in the home.

A good video below if you’ve got 15 minutes spare, Annie Tarasova explaining what they are, how they are formed and meanings of popular crystals.

How to choose a crystal

Choosing a crystal can maybe feel overwhelming at first especially as a beginner.

People are so focused on wanting to choose the right crystal and not making a mistake that they forget to use what matters most. There intuition.

Crystal healing is a spiritual hobby so it only makes sense that you would use your inner spirit to choose a crystal.

Some say that the crystal chooses you, so you need to ensure that you open your heart and your mind to allow this to happen.

Whether you are in a shop or buying your crystal online, you should clear your mind and open your heart. Take your time and allow yourself to be drawn to the crystal. Be patient. When you know you’ll know!

Keep your intention in your mind and either look at the crystal or hold it if possible. How do you feel? Do you notice any strange sensations like increase in heart rate, hot or cold feelings, a feeling of peace? Look for the signs.

What are intentions?

Our inner voice and thoughts create vibrations. These are sent out throughout the universe which is why intentions are so important.

Clear intentions and clear purpose provide insight into our dreams and values.

Imagine if you will your intentions are a magnet. In crystal healing having clear intentions allow the crystals to do their work. Set yourself clear intentions that are positive and your hearts desire.

  • Prioritise what is most important to you.
  • Think about aspects of your life that you want to improve.
  • Be clear about your goals and how long you will give yourself to achieve it, find reasons behind your goals.
  • Make your intentions a reality, write them down in present tense. Only write what you truly want, do this from your heart.

How to program and cleanse a Crystal

Before we talk about how we build a crystal grid, most importantly we must learn how to give our crystals their purpose and their job.

You have to program your crystals.

This is a very straight forward process.

Firstly we cleanse with sage smoke. This is achieved by placing the crystal in the smoke from the burning sage. There are alternatives like incense or Frankincense resin that you can use but sage is the most popular.

Then we leave our crystals in either moonlight or sunlight for a minimum of around 5 hours.

Now we bury the crystal in the ground for a few hours, this allows the crystal to be come charged with the energy from the earth.

Take the crystal straight from the earth and hold it in your hands. Breathe deeply, relax and let your eyes close. Go to a happy place and ensure your mind is full of love, peace and tranquillity.

While you’re in a happy place, with your crystal in your hand and your eyes closed ask your crystal to be cleared of negative energy. Say the following:

“I ask that the highest vibration of love and light connect with my highest self to clear all unwanted energy and any previous programming. I command these crystals to hold the intention of my infinite potential, (add your intentions here for the crystal to store) thank you, thank you, thank you!

What is a Crystal Grid?

Now we know how to cleanse and program our crystals we will learn about crystal grids.

Simply put a crystal grid usually consists of a centre stone and then numerous stones set in a formation spreading outwards from the centre.

Crystal Grids vary in size, they are very effective for creating intention energy and hold onto the energy for a long time after it is set.

The formations create harmonizing vibrations and link the energies of the stones/crystals.

How to Create Your very Own Crystal Grid!

To begin with you will need to make a decision on what kind of energy you would like to create and establish, this can be done with knowledge and intuition. Don’t overthink this as there is no real right or wrong way. Many will use a point in the center of the grid because it merges the energy radiated from the crystals together in harmony. It will also amplify the energy outwards. You can use a grid cloth to help with symmetry and map out the grid.

To choose your crystals you should first decide on the ones that are related to your intention. For example if your intentions are ones of love, then you would need stones related to love like malachite, carnelian, amazonite, rose quartz, flourite etc

Once we have chose our stones then we need to purify the energy of them. You can purify using sage smoke.

Now you will need to write what your intention is on a sheet of paper. Fold the paper and say it out loud. Next take your “intention paper” and place it underneath the center stone.

The center stone is the main stone which you will place in the middle of your grid. It is popular to have a center crystal with a point to transmit the energy outwards.

Next you will build up your grid around the center stone, these crystals are used for amplifying the energy.

Crystal Grid Example
An example of a crystal grid

The grid can be as full as you like, you should always remember to place them mindfully and to lead with your inner spirit.

Next you will need to “activate” the grid. We do this with a quartz laser point and draw a line to connect every stone, the line is invisible of course but as you draw it you should be visualising the intention you wrote on the paper becoming a reality.

It’s up to you how far you go with the crystal grid, you can add incense and candles around your grid to further amplify.

*You should leave your grid up for at least 30 days after you set it up.

What is a Crystal Wand?

There’s so much to write and learn about crystal wands so i’m just going to briefly touch on these. If you want to read a full guide to them you can do so here.

Crystal wands are made from crystals and are usually shaped with a point or cylindrical.

Quartz wands usually occur naturally but for other crystal wands you will need to take the stone and polish it.

They are used in crystal healing to further amplify the power and energy.

There are many types and each has it’s own specific use.

Chakras

If you’ve arrived here and are interested in Crystal healing then you no doubt have a basic understanding of chakras but for those of you who don’t let me elaborate.

Chakras are concentrated centers of energy in the body.

Their purpose is to absorb the energy and to keep us functioning on a day to day basis at optimum levels.

There are two types of chakras in the body these are minor and major.

Chakras are believed to control how we feel and our health. If chakras malfunction or are not looked after then we can end up feeling depressed or even becoming sick.

It is important as a crystal healer to look after our inner chakras by eating healthily and by positive thinking and love.

Located along your spine there are 7 main chakras.

These are:

root, solar plexus, sacral, heart,third eye, throat, and crown chakras

Each are tied to problems with the body, both physically and emotionally.

If you gain a better understanding of your chakras it’s a fantastic way of growing as a crystal healer and also a way to work in harmony with mind, body and soul.

3 simple ways to use crystals

These are 3 beginner ways to use basic crystals and what you have just learnt. These will increase harmony, your peace of mind and spiritural balance.

Clear Quartz

Quartz CrystalClear quartz is one of and if not the most popular type of crystal for beginners.

The crystal will amplify intentions from your crystal grids and the vibrations of the surrounding stones.

You can create a clear quartz wand to cleanse and energize crystals.

Take the clear quartz stone, sit somewhere peaceful and try to feel the positive energy radiating from the stone, let the white light that emits from it fill you. Think about your intention and believe in the quartz crystal.

Amethyst

Amethyst CrystalAnother very popular crystal for beginners is Amethyst, it is fantastic for meditation as it will give spiritual projection and increase your inner strength.

Again while contemplating the intention set out for the crystal you should put it in your bedroom or even at your desk in the office to invite the calming energies.

Amethyst is often used for healing in Yoga and meditation.

Citrine

Citrine CrystalCitrine draws the power of the sun and is filled with light in abundance. This makes the crystal fantastic for placing in a windowsill.

The sun will then recharge it every day, keeping its powerful vibrations at a maximum.

Citrine is considered one of the most powerful stones used for manifestation.

As a beginner you are going to want to have citrine, it will increase the chances of making your intentions into a reality.

Citrine also creates a positivity and  will stimulate your mind for motivation and to help you become more optimistic.

Take a citrine point and

Place a citrine point on top of a list of your dreams and intentions.

Beautiful to look at and are great healing crystals which will help us connect with Mother Earth.

Crystal Healing FAQ

Is Crystal healing the hobby for you?

I believe crystal healing could be for anyone. It will help you improve your mental health and your physical health.

Learning about crystal healing opens the door to so many other healing practices.

Not only that learning about the crystals and their powers is intriguing and exciting.

Is there more than one different crystal healing technique?

Yes there are many, however I believe the crystal grid to be the most popular and the best for beginners. As you advance in your crystal healing journey you will no doubt learn many more crystal healing techniques.

How do I choose the best healing crystal?

The best way to chose healing crystals is to let your spirit guide you, use your intuition and feel the crystal. This is perhaps one of the most amazing parts of crystal healing.

Can I use crystals just for decoration in my home?

Yes of course they look beautiful and on the plus side your home will be full of good energy!

Useful links

Types of Crystals and Uses

Online holistic & crystal shop

Crystal healing online courses

Crystal Healing Discussion

If you have any questions or would like to talk more about the wonderful hobby of crystal healing then please leave a comment below we would love to hear your questions and experiences.


Beginners Guide To Singing

Singing

What is singing?

Singing is producing sounds, of the musical type using the vocal chords. A person who sings is called a singer or sometimes vocalist.

There are many types of music a singer can perform and they are often accompanied by instruments or “backing tracks”

Some singing types are gospel, pop, opera, rock and reggae.

Singers who perform as a career choice usually will pick one type of music genre and train their voice around it.

History of singing

Singing is known to be the earliest type of music. At the very beginning when people sang the lyrics were never wrote down but passed on.

Songs at the very beginning usually told a story or important information about culture, events and history.

Most commonly in the middle ages, singing was used as a way of chanting in religious practices.

In the 14th century western vocal music grew from a simple mono-tonal chant to more complex harmonies and arrangements. Singing with the help of instruments took over.

As musical compositions and structure advanced around Europe so did the songs, they quickly entered theatres in the form of opera and musical plays. Composers began to write songs that would be performed in concert halls.

Vocal music in Europe spread influence to other countries like the United States of America.

In some countries to this day they pass on their folk songs, one generation to the next, without them ever being wrote down.

Beginners Singing - The History of Singing

Beginners Singing

Beginners singing I believe is about finding your voice, your range and basically staying in tune. If you can do this then you’re half way there.

When beginning your singing journey don’t run before you can walk. You will need to find your singing voice, your pitch and your vocal range.

The 5 Basics Components of Singing

Singing is entirely made up of 5 very basic components so as you’re a beginner lets take a look at each one in a little depth.

1) Breathing

Your breathing is the very core of your singing and it’s the first thing you will want to practice.

Breathing is a very natural occurrence as you will know, something you do without a second thought. The way we breath normally and the way we want to breath when singing are slightly different. First you will want to learn how we breathe, then you will want to practice creating the foundation breathing for your singing voice.

Check out the guide to breathing for singing.

2) Pitch

At some point we’ve all heard someone singing out of tune or perhaps we ourselves have sang a song off key.

Getting the pitch right is very important for a good singing voice.  When we sing we create a pitch, this is the high or low frequency of a sound the vocal chords produce while vibrating at a specific speed.

A singer will have to hit various pitches with an amount of accuracy in a song, these coincide with notes and will determine if the song is sang well or not. These pitches will also need to be in tune with instruments or other singers.

Good practice to begin with is to learn how to recognise pitches.

3) Diction

Most songs will be telling a story or sharing feelings through the lyrics so it is very important that your audience can understand them clearly.

This is achieved with good ‘singing diction’ learning how to pronounce words while singing using techniques like tongue placement, mouth shapes and breathing.

Via lyrics you can connect with an audience. Good diction can mean the difference between a good or bad performance.

4) Rhythm 

In every song we listen to it has a beat pattern. You’re going to need to keep your singing in time with the rhythm.

Try to learn how to determine the various beat patterns, and sing along in time keeping up with the basic tempo.

4. Voice

Voice and our vocal cords are an essential component of singing.

Learn how to understand the voice and vocal cords, having this knowledge will assist you in developing good singing habits and to sound as great as possible.

Basic singing terminology

As you’re a beginner singer it’s good practice to learn the basic music terminology, this will help you understand while trying to learn.

There are a vast range of musical terms that are used to guide the musician when singing or playing a song.

The below terms are only touching on singing terminology, for a more in depth list check out the full glossary of singing terms.

Acapella

To sing without any music backing.

Allegro

A faster more lively upbeat tempo.

Alto

Lowest voice (female) in a choir group.

Andante

A moderate pace.

Ballad

A romantic song of a slower tempo.

Baritone

A male singing voice of mid range.

Bass

The lowest male singing voice.

Beat

A main accent/rhythmic unit used in a musical composition.

Bridge

The transitional passage of a piece of music that connects 2 different sections of a song, you’ll usually hear the bridge after the chorus.

Chorus

The main part of a song often repeated numerous times.

Duet

Usually a song with 2 parts sang by separate singers, often will have sections sang together in harmony.

Encore

When more songs are requested after a set by the audience, usually this is a sign of the audiences enjoyment.

Falsetto

A weaker voice, more commonly higher pitch.

Harmony

2 or more notes played together that create a lovely harmonic sound. Usually found backing up a solo singer.

Interval

The distance measured in pitch between two notes.

Key

The group of pitches and scale that forms the foundations of a song or composition.

Legato

To sing or play a song smoothly.

Medley

1 song made of many songs leading into one another.

Octave

2 notes that are 8 complete tones apart, giving indication the beginning and the end of a scale.

Pentatonic Scale

A musical scale that consists of 5 basic tones.

Pre-Chorus

The part of a song that is usually before the chorus and after the verse.

Quartet

4 musicians performing a song of 4 parts.

Rest

To stop singing for the note duration.

Scale

The musical term that refers to the notes of a key that will either ascend or descend in a specific pattern.

Semitone

Half of a tone.

Solo

To sing a song alone.

Soprano

The highest of classical female singing voices.

Stacatto

To sing in a short detached way.

Tempo

The speed of a song.

Tenor

The 2nd highest male singing voice in classical music.

Tone

A steady periodic sound. A tone is usually determined by its duration, pitch and intensity (or loudness)

Treble

The highest part in harmonized music.

Tune

The melody for voices and a succession of musical notes.

Verse

Usually the first part of a song which leads into a chorus.

Vibrato

A slight pitch variation during a prolonged note giving a more varied sound.


Beginners Breathing Exercises For Singing

The Straw Breathing Exercise

A very simple beginners exercise to help develop your singing breathing skills is the straw breathing method. You can practice this exercise while standing or sitting it’s your choice.

  1. To begin with imagine you are about to inhale through a straw, take a breath through the mouth with this imaginary straw and slowly count to four in your head.
  2. Keep your imaginary straw in your mouth and straight after you have inhaled start to exhale while again slowly counting to four.
  3. Try to keep a continuous steady pace of inhaling and exhaling, as soon as you have inhaled for the count of four exhale and vica versa.  Repeat this procedure 3 times.
  4. When you begin to feel comfortable take a very short break and start again each time making the imaginary straw smaller and if you feel confident increase the times you inhale and exhale for. Go from 4 seconds to 6, to 8 to 10.

Notes: Remember to decrease the size of your imaginary straw and increase the inhale and exhale counts as you become more confident with this exercise.

Yoga Style Breathing

Yoga is very much about breathing and relaxing. We can use yoga to help us practice our breathing skills. Again it’s your choice whether you are standing or sitting when performing this exercise.

  1. Find a peaceful place at home or outdoors.
  2. Shut your eyes and relax, focus only on your mind and breathing. Try to shut out all distractions.
  3. Once you are comfortable and feel relaxed begin to inhale gently and slowly through the nose until you believe you’re about a quarter of the way through your total lung capacity, then hold your breath in for around 6 to 10 seconds.
  4. Do not begin to exhale, instead continue to inhale until you reach halfway of your lung capacity then again hold your breath for 6 to 10 seconds.
  5. Continue this procedure to 75% and then 100% and remember not to exhale and to hold for 6 to 10 seconds at each.
  6. Next very slowly using your mouth exhale your full breath. Once you have finished with your exhaling open your eyes.
  7. Breathe again normally and then repeat this exercise a couple more times.

Note: Make sure you are relaxed and remember to hold your breath at 25, 50, 75 and 100% of your lung capacity.

The Best Beginners Vocal Warm Ups

Before performing it’s a very well known fact that you should warm up your vocals.

It’s good practice to do this before every performance or attempting to sing a song.

Here’s some of the more popular vocal warm ups used by both professionals and amateurs around the world. They are popular because they truly help!

As you would be expected to warm up your muscles before you was to exercise or compete in a sporting event, you should always warm up your vocal’s. Completing the warm ups can help to broaden your vocal range, protect you against damage of the vocal chords and generally give you a better voice.

Solfege

You’ve probably heard the scale Do-Re-Mi-Fa-Sol-La-Ti-Do being used before, this is what they call a solfege scale. It’s a very popular warm up for a reason. Today we will just touch on the beginners solfege scale and warm up but when you are confident you can advance with the scales and go on to more difficult solfege exercises.

Follow the video below for a beginners basic solfege scale.


Siren Vocal Warm Up

Imagine making a siren noise with your voice, one example of this vocal warm up is the “NG” siren. Using the “NG” sound as a siren helps to warm up the vocal chords, it’s a gradual exercise which will help avoid you stressing out your voice. It uses both chest and head voice.

Put your tongue on the roof of your mouth which in turn should cause some “back-pressure” If you are doing it correctly you should feel the sound from the back of your mouth to the roof of your mouth.

Start making a siren noise using the “ng” sound, start from a low note and go up the scale, then back down again. Try to go to the highest note you can.


Lip vibrating (Trills)

Lip vibrating or also commonly known as the “Lip Trill” or “Lip Bubbles” are perhaps one of the most effective and useful vocal warm ups for beginners and pros alike.

Rather than me try to explain this step by step the following video explains all you will need to know about the lip trill and how to successfully carry this exercise out.


You can check out our beginners singing tips here for some great ways to drastically improve your singing voice.

Recommended online beginners singing course

I would always recommend singing lessons if you want to increase your singing skills. One to one lessons are always going to be the most effective as your vocal coach can assess where you need development, however, some of us just don’t have the luxury of time. There are many online courses available to help you increase your singing skills, some of them are fantastic. So in this article we will just touch on one of the most recommended on the internet.

Singorama

Singorama is an online course which is suitable for all levels, from beginner to professional the course will help improve breathing techniques, vocal range and give you a huge boost in confidence.

The Singorama course even comes with its own free software which allows you to record yourself.

The course takes you on a journey from beginner to pro and discusses breathing exercises and techniques, theory, harmonies, scales, posture and stage presence in depth. There are numerous lessons that take you through each section of the course and topic.

In total there are 28 different audio lessons, a pdf workbook, recording studio software and much more so as far as online singing courses go Singorama really does have it all. It’s been well received and there are many positive testimonials from people just like you and I stating that the course really helped them improve.


Check out the Singorama Course here

Singing FAQ

Where do I breathe from when singing my nose or mouth?

This highly depends on the style of music you are singing for classical singers some believe that breathing through the nose is more effective because it slightly warms the air as we inhale stopping you from drying your voice out. As a pop singer though It will be easier to breathe through the mouth.

Why do I run out of breath when singing? 

This is probably down to you not using your chest voice for singing. If you are running out of breath still while singing then you should continue to practice the breathing exercises mentioned in this article.

How do I increase my vocal range?

With practice and performing the exercises and warm ups previously mentioned in this article. You should gradually increase your range opposed to trying to quickly. You should perform scales gradually and do these as a daily exercise to increase your vocal range.

Why do I yawn when singing?

This I believe is down to a lack of oxygen however on the flip side it can be a good sign that you are doing things right and singing from the right place. Due to the soft palate raising when we yawn your mouth and body making the association with that. When raising your soft palate you will yawn, which is not a bad thing. Continue doing what you are doing eventually your body will get used to it.


Binaural Beats For Astral Projection

Binaural Beats

What are Binaural Beats?

Binaural Beats are two frequencies of sound are given to separate ears.

This creates a kind of auditory illusion by making the two frequencies of sound ever so slightly different.

The word Binaural is made up of “Bi” meaning two and “aural” which relates to the ear and sense of hearing.

To help you simply understand how Binaural beats work imagine when you strum two guitar strings together as you are tuning it. Once these sound frequencies get close on the strings of the guitar a slow pulsing beat can be heard.

The theory behind Binaural Beats can be rather difficult to grasp, but don’t worry it’s not all that important if you are here for Astral Projection and Lucid dreaming.

Let me just quickly explain the theory and how we calculate and we can move on.

To calculate the rate and frequency of a beat we must work out the difference in the two frequencies that are being played.

If you are listening to 2 frequencies one at 210Hz and one at 220Hz, then the beats per second would be 10 or 10Hz.

Binaural Beats and The Brain

To understand Binaural beats and how they effect the brain we must first understand how brain waves do.

Brain Waves and the brain

Rhythms Binaural BeatsThoughts, behavioral reaction and emotions are the results of neurons in the brain and electrical impulses (signals)

A large number of neurons are released together with the same pattern and rhythm these are synchronized and ultimately create what we know as “brain waves”

Brain waves vary in speed and sound frequency, from slow to fast, to low and high amplitudes & frequencies.

Brain waves can be categorized into 5 different major functions.

For Astral projection, there are only 2 types of waves that are relevant.

Delta and Theta waves.

Delta Waves are slow and loud and run from a frequency of around 0.5 to 3Hz. They are related to deep meditation, dreamless sleep and self-healing.

Theta Waves run from a frequency of about 3 – 8Hz and have been found to be related to meditation, intuition, creativity, the subconscious, dreaming and spatial navigation.

Various levels of these brain waves are released constantly at any given time.

What do Binaural Beats Do To Our Brains?

Different parts of the brain have different functions and purposes, the part we will talk about first is called the superior olivary complex. This can be found in the brainstem and will determine the direction of sounds.

The superior olivary complex performs an “entrainment” after synchronizing the different neurons.

So when binaural beats are played through the ear the brain then sends the sounds and frequency to the superior olivary complex which in turn creates change in brain waves.

Binaural beats can increase the strength of brain waves, which effectively will enhance or decrease emotional and other functions.

Benefits of Binaural Beats

  • Help with Anxiety – In a study with 15 volunteers, binaural beats that were played for 30 minutes in the theta range helped reduce anxiety.
  • Centre your attention – In studies using Gamma and Beta binaural beats students enhanced sustained attention and attention to visual details.
  • Lift your mood – Listening to 30 Minutes of Theta beats helped to decrease stress, fatigue and confusion in a study of 8 volunteers.
  • Ease Pain – A scientific study took 28 participants who suffer from chronic pain and made them listen to theta beats, the results showed that the pain was decreased.
  • Increase Memory – Listening to just 15 minutes of Theta binaural beats increased short-term verbal memory in a study of 20 participants. Working & Long Term memory were also dramatically increased using other binaural beats.
  • Help with meditation – Just 30 minutes of theta binaural beats increased the brain activity that is associated with meditation and a deep meditative state. This was carried out in a controlled study of 28 volunteers.
  • Improve sleep behavior – Theta Binaural beats improved sleep quality in a study of 15 participants.

It’s fair to say that binaural beats have been scientifically proven to have many positive effects.

Can Binaural Beats Help With Astral Projection?

So this is what this article has been leading to, this is what you have arrived here for! Let’s get to it.

Many people will tell you that Binaural beats can induce lucid dreaming or astral projection, this is simply not true. With that being said they can and will help you with astral projection.

In order to perform a successful astral projection, you will need to know how to astrally project and have at least practised the basic methods first.

Not only the knowledge of astral projection plays an important part but other aspects in your life to like a healthy diet, good sleep patterns, regular meditation etc

So if you are thinking of binaural beats as a shortcut into astral projection think again! Binaural beats will only assist and guide you. The rest is down to you.

The Beginners Guide To Astral Projection

Click here for our FREE astral projection beginners guide.

Are binaural beats dangerous?

Because binaural beats change the way our brains work and think for a short period of time there is often worries of danger.

However, binaural beats pose no danger whatsoever and are perfectly safe.

Do not obviously use binaural beats to astrally project while driving along a motorway though.

How do I use binaural beats for astral projection?

Often people will start by searching for binaural beats on music or video hosting sites like YouTube, Dailymotion or Spotify. You will find the right beats on them, what you won’t find though is the right quality.

If you are serious about using binaural beats for astral projection then you should look at using a professionally created and recorded beat.

We’ve found some great binaural beats at Ennora. They also have ones specifically for Astral Projection.

If you would like to listen to many different Binaural beats for free then you can sign up to Amazon unlimited here. This will give you access not only to Binaural beats for astral projection but binaural beats for other purposes, along with access to millions of songs.

TIP: Use headphones – It is important to use stereo headphones. This is due to the binaural beats using different sounds and frequencies. Alternating sounds are played through each side of the headphones. This can only be possible in stereo. Headphones will also allow you to block out background noise and distractions.

To use the binaural beats to assist you when you want to astral project simply go about your techniques the same way as you have learnt. Put your stereo headphones on and press play then carry out your usual technique.

There is no special way of using the binaural beats for astral projection just use them as an aid. Relax and listen while following out the steps from our beginner’s guide or whatever has worked for you in the past.

Binaural Beats and Astral Projection Summary

So to summarise this article of how binaural beats can help with astral projection:

  • Invest in quality binaural beats not free ones from media sites.
  • Use stereo headphones to listen to your beats.
  • Relax and carry out your astral projection technique as you usually would while listening to the beats.
  • Binaural beats do not induce astral projection but simply guide and assist.
  • Binaural beats are safe and not dangerous providing you are at home relaxed laid down when using them.
  • Binaural beats work much better when following a healthy lifestyle and with some experience in meditation.

Links & Resources

Best Binaural Beats For Astral Projection Here >>>

Beginners Guide To Cigar Smoking

Cigars

Warning: Smoking is not advisory, it is a very dangerous habit that comes with serious health warnings. We do not endorse smoking.

What are cigars?

Cigars are similar to cigarettes, they are rolled using tobacco leaves that have been left to dry and ferment.

Cigars are created in various sizes and shapes. For the purpose of this guide though we are going to be talking about the classic large cigar in general.

History of Cigars

It is often said that Christopher Columbus is responsible for introducing tobacco products to Europe.

In the 1400’s Christopher and his crewmen first experienced tobacco on the island of Haiti, which was known as Hispaniola back then.

Cigars and tobacco were also encountered in Cuba, where Columbus and his crew and had settled for a while. There were reports of the first types of cigar which were fairly primitive and were made by rolling dried tobacco leaves up in a palm leaf.

The popularity of smoking cigars spread rather quickly and soon European and Spanish sailors were smoking. Soon after it spread to Spain, Portugal and France.

Once smoking had hit France Jean Nicot had given his name to nicotine.

Fast forward a little and the use of tobacco had spread to Italy and when Sir Walter Raleigh ventured to the Americas it spread over to Britain. By the mid-16th century, it had spread to most corners of the world and pipe smoking became increasingly popular.

The Spaniards were the first to open up a cigar factory in Cuba in the mid 1500’s.

Some even believed that tobacco was good for you with many medicinal qualities, but Philip the 2nd and James 1st did not believe this and thought it was evil. They denounced smoking.

Israel Putnam allegedly brought back a large amount of Havana cigars during the Seven Years War which contributed to the popularity of cigar smoking in the USA just after the Revolution. He is also believed to have brought back Cuban seeds which were planted in Hartford and thus was born the popular Connecticut Wrapper.

Believe it or not, cigar smoking was much more popular than cigarettes at the end of the 18th century and beginning of the 19th.

To view the full history of cigars then have a read of this.

History Of Cigars

Beginners Cigar Smoking

Believe it or not, cigar smoking is classed as a hobby and is a lot more popular than you would have thought!

Although I have to stress the dangers of smoking and would not recommend you begin this hobby, it can be very relaxing.

Cigar smoking is also a great way to socialise with others and a traditional way of celebrating.

Parts of a Cigar

Before one can become a true cigar smoker, then one should know more about a cigar! Let’s take a look at what makes up a cigar.

Wrapper

The wrapper is the leaf that is wrapped around the tobacco inside and is the only part of the cigar that should be seen.

The wrapper is arguably one of the most important aspects of flavor and aroma.

It’s also the only leaf that is seen so has to be the right color.

Here’s a very well written Cigar Wrapper Guide, should you want to learn more.

Binder

The wrapper is very delicate and thin to ensure the optimum taste this means that it’s not strong enough to hold in place the cigars contents. So they have to use a “Binder” leaf.

The binder leaf is usually stronger and has the sole purpose of holding everything in place.

Binder leaves usually have a very little amount of aroma or flavor and also contribute to the consistency in which the cigar burns.

As the wrapper is both fragile and delicate, it isn’t strong enough to hold the cigar’s contents on its own. Therefore, a coarser leaf is often selected to securely hold everything in place.

Head

The head is the part that you put in your mouth, this is often capped.

Band 

The Cigar band is usually made of paper or foil and loops around the cigar.

This is to tell you the brand or variety of cigar.

Foot

The part which you cut and light is called the foot.

Body/Barrel

The space in between the head and foot of the cigar.

What do I need as a beginner cigar smoker?

Quality Cigars

Check out the websites at the bottom of this article for your quality cigars.

Cigar Cutter

A matter of preference but as a beginner cigar smoker then you should opt for either the Alaska Bear Double Guillotine for a straight cut or the Colibri V-Cut for the perfect V cut.

Lighter/Matches/Butane Torch

Remember with a lighter to not use a zippo or other petrol fuel lighter, you will ruin the taste. Matches or a butane torch/lighter are perfect.

How to cut a cigar

Cutting a cigar is a very important process, cut it wrong and you will totally ruin the way it smokes and quite possibly it may just fall to pieces.

You may have seen in the movies people biting the ends of the cigar of, trust me you don’t want to do this. It may look cool but if you want to enjoy your cigar then avoid this method.

What we want to do is to ensure that the cigar lets the smoke run smoothly and feely through the end.

If you cut the cigar to far down the body, the wrapper may start to unravel. If you cut the cigar to far up it’s hard to draw the smoke through into your mouth.

As there are a lot of cigar shapes it can be quite difficult to determine, this is something that will come with practice.

As a guide, you usually want to cut approximately 1/16th of an inch from the head of the cigar.

This is why a cigar cutter is highly recommended it ensures the cut is clean and accurate.

The cigar cutter is like a guillotine and can cost as little as a few dollars.

Here’s a video for those who don’t understand what I have wrote:

How to light a cigar

Many people make the mistake of smoking the cigar as they are lighting it. This is wrong. It can leave a chemical taste in your mouth and completely ruin the taste of the cigar.

Most people opt to light the cigar with a standard lighter or match but some will use a butane gas torch.

To light, you simply hold the cigar to the flame, until it starts to burn and glow. Ensure you rotate the cigar and brown the edges barely. Try not to get the flame on the wrapper.

Next, take the cigar to your mouth and draw (puff) if it’s not lit properly or you feel like it needs more then take the cigar back to the flame.

You should repeat the lighting process until you feel the cigar is smoking to its potential.

How to hold a cigar

Yes holding a cigar is a big part of the cigar smoking hobby. Especially if you want to take this seriously.

Let’s discuss two kinds of acceptable ways of holding your cigar, then we will talk about how you should NOT hold your cigar.

Holding A Cigar MethodMethod 1 requires you to take the cigar and hold it gently in your hand, resting it between your thumb and three or four fingers.

Do not grip the cigar too tight, it should be that lightly rested in your grip that you can perform a rolling movement, rolling it back and forth with your thumb and fingers.

The size and length of the cigar will determine how many of your fingers you will need to use. Never use less than two!

Holding A Cigar Method 2Method 2 is what they call a pool cue grip. I personally prefer method 1 however this is completely acceptable in the cigar smoking community. I’ll try to explain but I will include an image to ensure you understand.

Take the cigar and wrap your index finger and thumb around it while it leans across your third finger, kind of like the grip you have when resting a pool cue in it.

How not to hold a cigar:

How Not To Hold A Cigar

So now we have the 2 basic acceptable ways that will make you look pretty cool, let’s discuss a commonly made mistake when holding a cigar.

This method not only looks wrong but it’s actually putting your cigar in danger. It’s unsupported and you run the risk of dropping it or the ash.

Holding the cigar between your index and third finger, with the rest of the fingers spread is how many choose to smoke a cigarette but is the most unacceptable way of holding a cigar.

How to smoke a cigar

Who knew that there was so much to learn about cigar smoking right?

To enjoy cigar smoking as a hobby you have to enjoy the different flavors that cigars can bring.

If you want to continue this hobby it’s important that you learn to smoke a cigar in the most enjoyable way without coughing up a lung or giving yourself a bad sore throat.

When I personally enjoy a cigar, I find a relaxing place to sit that is quiet and comfortable. I like to enjoy the cigar, every last draw.

You’re going to want to take a puff on the cigar every minute or so, don’t puff to fast and don’t puff to slow.

You aren’t going to want to inhale the smoke as you would do from a cigarette, you want to taste the smoke in your mouth and not cause damage to the lungs. Savor the flavor then exhale!

Cigar Storage

Cigar Humidor

Cigar storage is very important, if not stored at the correct humidity and temperature your cigar can potentially be ruined.

I will only loosely touch on this subject as until you know whether you are going to stick at the hobby of cigar smoking then it’s not something you want to invest in.

They are however a necessity if you want to take your cigar smoking hobby seriously and to the next level.

To store your cigars the best way is in a Cigar humidor, they help keep the cigar moist and at the optimal flavor. In a humidor, cigars will mature, without they will rapidly deteriorate.

There are many types of humidor available for many different purposes.

Travel Humidors will allow you to take a selection of cigars with you on vacations, business trips and such like. The travel cigar humidors fit nicely into a briefcase, golf bag, hand luggage and more.

Table Top Cigar Humidors are perfect for home storage, they allow you to store your cigars correctly while in reach. They range in size and can hold from as little as 10 to as many as 100 cigars.

A good cigar humidor will be constructed from the best materials and will be of high quality. Designed for the perfect storage of your cigars.

Be prepared though if you want something of real quality you can pay a lot of money!

That being said there’s a really good one that can be found here it’s made from cedar wood and includes a hygrometer and humidifier for below $50!

What are the best types of Cigar?

Cigars are mainly broken down into 3 types, much like coffee roasts each has its own unique flavor and strength.

Mild Bodied Cigars

Mild bodied cigars tend to have a subtle flavor, one that is soft in taste, not sharp or bitter.

I and others recommend:

Nat Sherman Sterling

Davidoff White Label

Medium Bodied Cigars

The most popular type of cigars, they usually have a rich flavor with the smoke being dense and rich too. A great middle ground cigar that pair well with coffee and a good bourbon whisky.

A couple of popular choices:

Tatuaje Tattoo

Camacho BG Meyer Gigantes

Full Bodied Cigars

The most flavorsome of cigar types is full-bodied. Depending on the cigar brand, full-bodied cigars can almost create a spice flavor. Rich and tasty and go well with a steak dinner!

Here’s a couple I recommend:

Ashton VSG

Arturo Fuente Anejo

Cigar Smoking Tips


  • Avoid using a zippo or petrol lighter to ignite your cigar. You could potentially ruin the taste of your cigar by allowing the chemical taste to enter.
  • Get the perfect cut by using a double-bladed guillotine cigar cutter, lay it flat on a hard surface, put your cigar in it straight up, and cut. It will take the correct amount from the head and leave you with a nice straight cut.
  • If you feel like your cigar is too tight, then gently massage it while squeezing it. This should loosen the insides. A more intrusive method is if you notice the cigar is tight before lighting take a skewer and poke a hole through it lengthwise.
  • Lighting a cigar that has gone out after being left sat can be achieved by tapping off the ash, blow gently through it, this will remove any stale leftover air. Continue to do this as you relight to help get rid of the sour flavors.
  • Keep your cigar burning nice and even by rotating the slower burning side of the cigar to the bottom.
  • Some people like to remove the label of the cigar, if you are one of these people leave it on when you first light up for a few minutes. This allows the heat to get to the glue from the label and loosen it. You won’t damage the wrap then when you remove it.
  • Don’t tap the ash! Roll it in an ashtray to remove. Don’t do this too early, Cigars are not the same as cigarettes. Optimal length is just over an inch. Don’t let the ash get too long or it will restrict airflow.

Useful Cigar Smoking Links & Resources

Simply Cigars – UK Online Cigar Shop

JR Cigars – US Online Cigar Shop

The Ultimate Cigar Book – Take your cigar knowledge to the next level with everything you need to know about Cigars and more.


Beginners Guide to Yo yoing & YoYo

Yo-Yoing (Yo yo’s)


What is a Yoyo?

A yoyo or also spelt yo-yo is a popular toy and has been that way for thousands of years. It is made from 2 spherical disks that connect to an axle, there is then a length of string which attaches to the axle with a loop.

What is Yo-Yoing?

Yo-Yoing, I’m not sure if that’s even a real word, is the art of releasing the yo-yo’s from about chest height and repeatedly reeling it in, catching the spool and then releasing again.

That description probably makes the whole thing sound rather plain, but add tricks and competition into the mix and you’ve got yourself a great hobby.

History of Yo-Yoing

Yo-Yoing has been going on for more time then you may imagine, it can be dated back to around 400BC.

There is a Greek Vase from the Antikensammlung Berlin collection which clearly shows an image of a young boy playing with a Yo-Yo, this is dated to 440BC.

It’s also believed that the spool/disc part of a Yo-Yo was also at times made from terracotta and was a toy offering to the gods when children reached a certain age.

The YoYo as we know it today was re-born in 1928 when a gentleman called Pedro Flores opened a manufacturing business in Santa Barbara. Pedro was an immigrant from the Fillipines and lived in the United States of America.

Due to the massive demand and popularity, within just one year Pedro had to open 2 more factories in LA and Hollywood.

Approximately 300,000 Yo-Yo units were being manufactured and distributed per day.

The success continued (read more about the history)

Beginners Yo-Yoing

Where do I start?

The only way to get involved with Yo-Yoing is to head off and get yourself a yoyo! There’s little you can learn about this hobby from reading.

The only way you’re going to be a pro is practical practice, it’s a skill you will develop and just like any other skill the best way to learn is to practice as much as possible.

With that being said I can teach you what the best equipment is, some beginner tricks and techniques and how to get the basics down, read on!

What YoYo’s are best for beginners?

Before we recommend a good Yo-Yo for you let us take a closer look at one and break down what components it is made from, what materials can be used and how they all come together.

Yo-Yo Shapes

Yo-Yo’s can come in different shapes and sizes but there are generally 3 different shapes they are made in.

Types of Yoyo

Classic

The classic shape is the yo-yo you have probably seen on the shelf in stores or on TV at some point, it’s exactly how you would picture a yo-yo. The shape that started the Yo-Yoing trend.

Modified

Modified Yo-Yo shapes can also be known as ‘flywheel’ or ‘modern’

They have become increasingly popular over the last 15 years, with hobbyists combing shape elements and streamlining the original designs to maximise performance.

The modified Yo-Yo’s can increase spin times and perform better for loop tricks.

Inside it has rounded smoother walls creating a larger gap and is generally smaller than the wing shape we talk about below.

Wing Shape

A wing shape Yo-Yo is another popular style of Yo-Yo and you may well have also seen this shape before.

It has a larger space between the discs allowing the YoYo to be caught on the string much easier.

Wing-shaped are also known as a flared gap or butterfly Yo-Yo and you will often find that the higher end yo-yos are created in this shape and are probably the most popular type.

I believe the popularity of this shape is because of the tricks you can do with them.

Yo-Yo Axles


Ok so the next component is the axle of a Yo-Yo, sit down grab a drink because there’s a lot to learn about yo-yo axles.

To put it simply the axle is the component of a yo-yo which holds it all together, this is also what the string is attached to.

The axle component of a yo-yo has a large impact on how it will perform.

Let’s take a closer look at the different types of yo-yo axles available.

Fixed

A standard fixed type of axle is commonly seen on the basic classic yo-yo, the axle is part of the structure and does not move independently.

Ball Bearing

Highly increasing performance of loop tricks, this type of axle has a ball bearing between the inner and outer parts of the axle. The ball bearing also increases the responsiveness of the yoyo.

Clutch

Also known as the brain, Yomega were the first to make the Clutch Axle popular with their Yomega Brain Model.

Clutch Axles uses a force known as centrifugal, to wake the Yo-Yo up and in effect automatically return back up to your hand.

As the Yo-Yo spins the centrifugal force forces the clutch open, and as it slows down it starts to close. This makes the Yo-Yo return.

Yo-Yo’s with this centrifugal clutch technology are a great choice for beginners. They simplify the amount of skill needed and assist you in performing tricks. Once you have mastered this type of Yo-Yo it is advised to move on to another type so you are not reliant on the clutch.

Trans

Transaxle YoYo’s have a fixed axle that sits in a sleeve, this also turns freely.

The sleeve in effect allows the yoyo to spin longer because it dramatically reduces any friction when the yoyo spins.

Commonly the sleeves are made up from metal or plastic.

Non-Responsive Ball Bearing

Quite possibly the latest trend, non-responsive ball bearing yo-yo’s do not “wake up” when you perform the sleeper trick and pull the string to return.

To make this kind of axle and yoyo return there is another trick you will have to learn that is called a bind. This effectively brings the string together in a bunch while it is spinning, and forces the yoyo and string to catch returning the Yo-Yo to your hand.

It may sound like the worst kind of Yo-Yo but it actually opens the door to a whole new world of tricks that can’t be performed on any other kind of yoyo.

It’s another great type of Yo-Yo for beginners and although it’s hard to master the “bind” once you have you’ll be on to all kinds of awesome stuff.

The fun thing about Yo-Yo’s in 2018 is that you are not limited to one kind and because of the range available now the tricks you can perform are endless!


Yo-Yo Materials

Yo-Yo’s are manufactured using 3 different types of materials, they all have an impact on how the Yo-Yos perform. These are 3 basic materials:

Wood

The very first yoyos were crafted from wood and still to this day are manufactured using wood.

Plastic

Plastic is the most used material when manufacturing yoyos and the majority are made this way.

They are often made from a very durable and hardened plastic and are made in many different designs and colors.

Metal

Yoyos that are created from metal often out perform other materials but are more expensive to buy.

Aliminium is usually the metal of choice because it is lighter than most other metals.

They are also normally heavier giving them a longer spin time.

Yo-Yo string

It is good practice to replace the string on your yoyo often, you will find that if you let it wear too much the string will eventually snap.

A good choice for yoyo string is to choose a blended string that is made from two materials, polyester and cotton.

Recommended Beginners Yoyo

We could list numerous Yo-Yo’s for beginners but I don’t want to overwhelm you with choices, I will just recommend the one I started with and one that has a great reputation with people just starting out.

Henry’s Lizard Yo-Yo

Henrys Lizard YoYo

Henrys Lizard YoYo’s are a great beginners yoyo this is largely down to the fantastic performance.

It’s manufactured in the “butterfly” shape which we discussed earlier in this beginners guide and has a slider bearing response system.

Not only that but you get a free book of tricks and cool flamed travel bag!

  • Dimensions: 62mm x 32mm
  • Weight: 68g

Check out Henrys Lizard YoYo on Amazon >>>

How to YoYo?

So your Yo-Yo has arrived and now you want to know how to use it.

To begin with we need to master the basic movement of throwing the yo-yo down, bringing it back up and catching it in your hand.

Before you even think about learning tricks you will need to have the basic part mastered, it’s not as simple as it sounds, but it sets the basis for lots of other tricks on the yo-yo.

The Basic Yo-Yo Throw Down 

So here’s a short video and a written step by step.


Step 1: 

Place the yo-yo on its edge in the palm of your hand, it wants to be placed in the centre of your thumb and your middle finger.

Your arm wants to be extended outwards just below shoulder height and make sure you have the string over your middle finger. The string should also be over the top of the yo-yo.

Step 2:

Bring the yo-yo up in your hand and arm like you’re about to flex your biceps and then flick your wrist and arm downwards to throw the yo-yo straight down, try your hardest not to let it go to the side.

Step 3: 

As the yo-yo gets to the end of its length of string you need be ready to make it return.

When it’s at the bottom slightly tug upwards and the yo-yo should climb the string and return back to your hand.


Beginners YoYo tricks

Once you have mastered the art of throwing down the Yo-Yo and returning it to your hand, you are then ready to learn your first tricks!

In this beginners guide to yo-yo’s, we are only going to discuss the most common and most basic, all of these tricks will also give you the core skills and techniques to advance to more difficult ones.

Never the less they are all pretty impressive!

How to do the sleeper on a yo-yo.

There’s a video above if you prefer to watch and learn, in effect the sleeper trick is about “putting the Yo-Yo to sleep” this is achieved by throwing the yo-yo down and making it spin for a length of time as it hits the bottom of the string, opposed to it returning.

Step 1:

I’m presuming you have the basics locked down as I’ve explained above and can perform the basic throw down and return. So now throw the Yo-Yo down as in the basic method.

Step 2:

This time though you don’t want it to return so as the yo-yo gets to the end of its string you need to, at the right time, pull your hand and cushion the landing (like a tiny flick)

Step 3:

The Yo-Yo should now be spinning at the bottom of the string in what they call “the sleeper”

Step 4:

After watching in amazement at the success of your first proper trick, to return the yo-yo, tug up. It should now climb the string and return to your hand!

Note: Ensure your YoYo string is neutral and not too tight as this could stop you from performing the sleeper trick. A good way to do this is to unravel the string until the end and re-spool it but ensuring it’s not to tight around the axle.

How to do the forward pass on a yo-yo.

Step 1: 

Take the Yo-Yo in your hand like you learnt when doing the “Throw down” this time though you aren’t going to hold it at the front of your body you will be holding to your side, switch it so that the back of your hand is facing forwards.

Step 2: 

Now you will be throwing the Yo-Yo directly in front of you, you achieve this by flicking your wrist and swinging your arm in a forward motion.

Step 3: 

Again as in the “Throw Down”, once the yo-yo gets to the end of the string, you will be giving it a little tug. You will also need to flip your hand over, palm up and catch the Yo-Yo.

Note: This can be quite difficult to master so don’t be disheartened if you don’t grasp it the first few times, as long as it hits your hand after the tug you are on the right track. Keep practising and you will soon be catching the Yo-Yo!

How to do around the world on a yo-yo.

For this trick to work, you will need to have mastered the “sleeper” and “forward pass” tricks. So if you haven’t I’m afraid you will have to go back and keep practising.

Step 1: 

Firstly you need to get yourself ready to do the “forward pass” yo-yo trick. Throw out the forward pass but don’t tug as it gets to the end of the string.

Step 2: 

Where you would usually tug as it gets to the end, you should swing in a 360 degrees arc shape, over your shoulder and behind your back. For the whole trick the yo-yo needs to stay and the end of the string spinning in the sleeper while it travels around.

Step 3: 

As the Yo-Yo returns home, in front of you, tug at the string and bring the yo-yo back to your hand.

Note: Safety is paramount with this trick, ensure you have a lot of space around and above you and that nobody is stood too close.

How to do walk the dog on a yo-yo.

Step 1:

For this awesome “walk the dog trick” you should begin the trick by performing the sleeper trick but this time throw it down hard so it’s a much faster and longer sleeper.

Step 2:

Move the yo-yo forward while letting it sit gently on the floor. Allow the “sleeper” spinning motion to drive your Yo-Yo forward pulling it along the ground.

Step 3:

As the Yo-Yo comes to the end of it’s spinning motion, slightly pull back and the Yo-Yo should return straight to your hand.

Note: The Yo-Yo may snap back while in step 2, but do not worry just keep practising you will get it soon enough. Also be aware of the surface you are “walking the dog” on as some will damage your Yo-Yo.

How to do rock the baby on a yo-yo.

Step 1:

Hopefully, by now you can throw down a mean sleeper and it spins….well forever! So throw it down, as it sleeps lift up the yo-yo hand until it’s just above your head.

Step 2:

With your other hand, the one that is not holding the Yo-Yo put it out in front of the string. With your fingers apart and your palm facing your body. In between the YoYo string and your body. With your little finger, about a third of the way down the string catch it with the top of your thumb and little finger.

Step 3:

With the hand that is holding the Yo-Yo grab the string, a good few inches above the Yo-Yo

Step 4:

Bring your Yo-Yo hand slightly above your free hand creating hopefully at this point the triangle shape. This is known as the cradle. If by now you are lost you should really press play on the video above as this trick is much easier to learn while watching, opposed to reading.

If you have done this correctly the Yo-Yo will be able to fit nice and snug in the middle of the “cradle” of string that you’ve created.

Step 5:

Rock the yo-yo or “baby” back and forth between the cradle.

Step 6:

Tug the Yo-Yo while letting go of the yo-yo string and it should snap back to your hand.

Note: This is probably the most advanced trick I will mention on this beginners yo-yo tricks guide, it will take some practice and hard work! Keep going persistence is the key!

Useful YoYo Resources & Links

YoYo Tricks – A comprehensive how-to guide for hundreds of YoYo Tricks.

YoYo Expert – More elaborate and advanced Yo-Yo tricks, Videos and Store.

40+ Epic Yo-Yo Tricks Book – Each trick comes with clear step by step instructions and easy to follow illustrations.

Beginners Guide to Coffee Roasting at Home

Coffee Roasting


What is Coffee Roasting?

Coffee Roasting is the process in which you bring out the flavour and aroma in raw green coffee beans. It is achieved with heat and turns the coffee beans from green to brown.

How does Coffee Roasting Work?

Using a high temperature the green beans are roasted, this causes a chemical reaction. When at optimum taste and flavour the now brown coffee beans are cooled to bring the process to a halt.

Coffee roasting is not as simple as it may sound, there is a skill involved, one that can be learnt over time which is what makes it a pass time and hobby. You will have to develop a skill that allows you to determine when the roasted bean is at optimum flavour and aroma. It all boils down to a split second window, roast too much or not enough and your whole batch can be ruined.

Where do Coffee Beans Come From?

There are two types of coffee plant, the Arabica or the Robusta, both come from the seeds of berries, which means your coffee beans start their life as fruit. The difference between Arabica and Robusta can be found here. 

The berries are left to become ripe, they are then picked, processed and dried out.

Coffee plants and their fruit are grown and cultivated in more than 70 countries worldwide but primarily they are grown in the equatorial parts of The Americas, India, Africa and South-East Asia.

Ripe Coffee Beans


Stages of Coffee Roasting

With an incredible, 800 different types of flavours and aromas, roast coffee actually only has four main, basic types of roast.

Light Roast Coffee

Simply put a light roast coffee is roasted for the shortest period of time, absorbing the least amount of heat of all 4 types of coffee roast. Light roasted coffee is of a light brown colour and usually are not roasted beyond what they call the first crack.

The first crack is where the beans expand and crack when they get to around 350 degrees Fahrenheit.

In regards to flavour, light roast coffee beans taste almost acidic and earthy. They contain the highest amount of caffeine because the more a coffee bean is roasted the more caffeine is burnt off.

Some of the familiar names you may have heard of in the light roast coffee category are Cinnamon roast, half & light city and New England roast.

Medium Roast Coffee

In the USA the medium roast coffee is probably the most popular with the highest sales. With a medium brown colour and a non-oily surface, the medium brown cup is full of flavour and traditional. At around 410 degrees Fahrenheit the medium roast coffee is complete just before the second crack.

As they are heated for a longer period of time the amount of caffeine medium roast contains is less than light roast.

Some familiar types of Medium Roast Coffee are City, American and Breakfast.

Medium/Dark Roast Coffee

Medium roasted coffees have a little amount of oil on the surface and are a medium brown colour. The flavour is almost spicy and aromas are noticeable.

Medium Roast coffees are achieved at the beginning of the second crack at around 225 degrees Fahrenheit.

They contain more caffeine than Dark Roast but less than light or medium roasts.

Some popular coffees in the medium to a dark roast category are After dinner and Vienna.

Dark Roast Coffee

Dark Roast can appear almost black and are very dark in appearance. The dark roast coffee is heated for the most time of all coffee types and contains the least amount of caffeine.

Dark Roast Coffee is often used in espresso and can taste rather smokey and bitter, they may also have a charcoal flavour to them.

Heated to around 465 degrees Fahrenheit and beyond the second crack is when dark roast coffee is ready.

Popular types of dark roasts include Espresso, Spanish, Italian and French.

What Equipment do I need for Coffee Roasting?

The best thing about taking up coffee roasting as a hobby is the minimal amount of equipment you will need to get started, you can do it even when working with a very small budget.

  • Unroasted Green Coffee Beans (mandatory) – You will NEED to purchase unroasted green coffee beans in their raw state, a good rule of thumb is to buy double the amount of green coffee beans according to the amount of roasted coffee you want to produce. So for example to produce a pound of roasted coffee you will need to purchase 2 pounds of unroasted beans. My favorite raw coffee beans
  • Skillet (budget method choice) – Using a skillet is a difficult method but a good option to those of you working with a budget, all you will need is a good quality cast iron skillet. We found a fantastic skillet on Amazon for a bargain price with thousands of positive reviews (Check Price on Amazon)
  • Popcorn popper (budget method choice) – Yes, you read that right, a popcorn popper. Not just for popping popcorn so it seems. Also a very good way of roasting coffee, you can’t just use any old one though. To roast coffee at home with a popcorn maker It will need to be a hot air and open top, that allows you access to the coffee beans while roasting so you can stir them. The Hamilton Beach Hot Air Popcorn Maker is often used for roasting coffee and has received very positive reviews.
  • Oven (budget choice) – You can use your oven but this is probably the most difficult way to carry out the roasting process.
  • Hot Air Roaster (best choice) – Hot air coffee roasters are by far the most simple method of roasting coffee beans, you simply add your raw coffee beans and press a button. Voila, the whole roasting process is automated. Kind of takes the fun out of the home coffee roasting process, that being said you’ll end up with your perfect roast coffee each time.  Check out the FreshRoast SR500, we’ve written a little more about further down this guide.
  • Metal Colander 
  • Oven Tray
  • Airtight container – For storing your roasted coffee beans in once they have been roasted to your preference, the airtight container should be stored in a cool dark place to ensure they last for the maximum amount of time.
  • Digital Scales – Digital scales or normal scales are perfect for weighing out the correct amount of raw coffee beans before adding them to be roasted.

How to roast coffee at home

There are several methods you can choose from when roasting coffee beans depending on the equipment you have, some are more straightforward and simple than others.

I have taken the 4 most popular home coffee roasting methods and explained step by step “how to” with each.

Method 1 – Roasting Coffee at home using the oven

Before you try this method you should know that of all the roast coffee methods this is the least popular, and the least effective/successful.

The beans will not be as evenly roasted as other methods and the flavours are often not as desired.

It really is a method of trial and error and the type and standard of your oven will play a huge part in your final product.

That being said it’s a method you can try straight away without the need to purchase any more equipment.

  1. Firstly you should preheat the oven to around 450 degrees Fahrenheit.
  2. While waiting on the oven to reach optimal temperature, lay your raw beans out on the pan, ensure they are even and cover the whole pan without overlapping each other. You will need a pan that has numerous small holes with a slight lip to keep the beans in the pan, I use a vegetable steamer basket.
  3. Once the oven is at the correct temperature place the pan of beans onto the centre shelf/rack in the oven.
  4. Leave the coffee beans for about 15 to 20 minutes and at this point, you should start to hear a crackling and popping noise (first crack)
  5. If you want a more dark roast then you should continue to roast, remember to stir the beans around a little every few minutes to ensure an even roast.
  6. When you have reached your preferred roast you should put on your mitts and remove the pan from the heat immediately.
  7. Pour them directly into a colander, take a second colander and empty them back and forth into each other. If you haven’t got a colander then you can pour them onto a tray with cookie sheeting and slide them around for a while. This part helps the bean aerate and removes residue.

Method 2 – Roasting Coffee Using a Skillet

For this method, you can either use a large cast iron pan or skillet.

For the best possible taste ensure that the pan is clean before use as you don’t want the coffee flavour tainted by last nights dinner.

  1. Place the pan or onto the stove/hob. Bring the temperature of the pan to around 450 degrees Fahrenheit or less if you are wanting to achieve a lighter roast. At this point, it’s a good idea to have a thermometer to check the temperature.
  2. Once you are at this temperature you can add the raw green coffee beans. Only add a maximum of 8oz of beans. Stirring at this point is very important if you want to roast the beans evenly. You will need to manually stir with a spoon or spatula as there is a much higher chance of burning the bean.
  3. At around the 4 minutes mark, sometimes longer you will hear a popping or crackling sound coming from the pan, the beans are now at the start of the roast. The beans will also produce a coffee scented smoke that is really strong. Depending on how you want your roast, light to dark it is an important time now for you to watch.
  4. Check the colour of the coffee beans regularly, when you have achieved the roast you desire it’s time to pour them out onto a metal colander. You will need to continue to stir the beans until they have cooled.
  5. Once the beans have cooled remove them and put them in an airtight container and store them in a dark and cool location.

Method 3 – Roasting Coffee Using a coffee air roaster

Using a coffee air roaster really does take all of the complications out of it, it makes things as simple as selecting your preference, pressing a button and hey presto perfect roasted coffee beans.

As I previously mentioned I personally own the Freshroast SR500 and I haven’t got a bad thing to say about it.

  1. Measure out your coffee beans into the coffee roaster.
  2. Press the pre-set setting that you want to use for your personal preference of roast coffee.
  3. Once the roasting time has passed you can choose to press a button for an extra cooling cycle if you wish.
  4. Now remove your roasted coffee beans and place them into a storage container for later use.

That is really how simple it is once you have a coffee air roaster, if you are not confident in doing things more manually but want to have the perfect roasted coffee beans then this is your best option.

It may cost more to buy but it makes the process so simple and will save you lots of time in the long run.

Method 4 – Roasting Coffee with a popcorn popper

A very popular home  method, however, before I explain how you can achieve roasted coffee with a popcorn maker I need to make you aware of a couple of things.

Using a popcorn popper for roasting coffee with almost definitely void any warranties you may have with the products this is because you are using it beyond its intended use.

There also is a possible risk of fire. So use this method at your own risk.

  1. Switch on your popcorn popper and let it warm up for approximately 30 seconds, then quickly add around half a cup of raw coffee beans. (Max amount will be when the popcorn popper barely rotates the beans)
  2. Leave the lid off the popcorn popper for now and begin to stir the coffee bean inside, once the beans inside start rotating more easily you can then add the lid.
  3. Soon you will start to see the silver skin of the coffee appearing from the chute, this should have taken place around 2 and a half minutes into the process.
  4. At around 4 minutes the bean should hit the first crack and you will start to hear crackling from the popcorn maker. You are now at the light roast stage of your coffee if that is what you want to produce (skip to 7) if not continue.
  5.  After another minute or so a different type of crack can be heard, it should be more muted but higher pitch than the first crack. You are now at the second crack stage or medium roast. If this is the roast you desire you should stop now (skip to 7) if not you can continue.
  6.  I only usually take it to around 30 seconds from the second crack and have never really let it go much further as this is my own preference, however, should you want a darker roast then leave for another minute after the second crack I would suggest. You should be able to observe the bean and tell.
  7. Switch off the popcorn popper, put on your mitts or gloves, and pour out your coffee into your colander (Warning the coffee is extremely hot)
  8. Take a second colander and pour the roasted coffee beans between the two of them, back and forth, this will aerate the coffee beans. (If you don’t have colanders you can use a tray with cookie sheeting and slide the beans around)

Best Coffee Roasting Machine

There aren’t many coffee roasting machines available on the market, well at least not good ones anyway.

The coffee machine we are going to discuss is a fantastic price and has received great feedback.

FreshRoast SR500 Automatic Coffee Roaster

Freshroast SR500 Automatic Coffee Roaster

  • Very Simple to use, perfect for beginners.
  • Clear container so you can visually check your coffee bean preference.
  • Chaff and oil collection.
  • 90 grams of raw beans capacity which yields around 78 grams of roasted.
  • Manual stirring or select high fan for even roasts.
  • Quietest air roaster; Great visibility; Very simple to use; Chaff collection; Durable; Small footprint; cooling cycle

With over 300 positive reviews the Freshroast SR500 is the perfect beginners coffee roasting machine.

You can fully automate the roasting process and yield perfect roasted coffee to your preference every time.

The default setting is around 6 minutes which will give you a light roast all you have to do is press a button to add 6 seconds to the timer. You can press as many times as you like until your roast coffee is as you like it!

I love that the chaff cleaner is located on the top of the machine making it super easy to clean.

Remember guys when you are roasting coffee with the SR500 to ensure you have ventilation, roasted coffee beans can give off quite a strong unpleasant odour while roasting.

You can grab this coffee roaster for a great price

(Check Price & Reviews for the Freshroast SR500 on Amazon)

How to store your Roasted Coffee Beans

Once you have your roasted coffee beans you’re going to want to store them correctly so you keep the flavour and freshness locked in, this part is very important.

The moment the coffee beans are roasted they will start to lose flavour and aroma. This is down to heat, light, air and moisture.

To keep all of the flavours locked into the roasted coffee beans for the maximum amount of time you should keep them sealed in an airtight container at room temperature.

I recommend keeping them away from light and heat. So you will need to find a nice cool and dark place like a cupboard away from the oven or other heat sources.

Here’s a perfect airtight opaque container for storage (Check Price on Amazon)

Home Coffee Roasting Tips

  • Disable smoke alarms and open windows if you are roasting coffee beans, but remember to turn the smoke alarm on afterwards. Roasting coffee will produce a lot of smoke!
  • If you are roasting coffee beans in a skillet or pan then invest in a thermometer, a candy making thermometer will be perfect.
  • The darker the roast the less caffeine the roasted beans will contain.
  • Continuously check the colour of the beans and listen for the sounds to ensure you get your optimal preference for roast coffee.
  • Be careful going beyond the second crack this is when the bean will start to burn.
  • Always clean any equipment you use to roast your coffee afterwards removing all of the skin and residue (known as chaff)
  • Try different methods for a different amount of time until you find your favorite roast bean.
  • Some new popcorn makers have a built-in cut off which won’t allow them to go beyond a certain temperature these can’t be used to roast coffee.
  • If you are using a popcorn popper to roast coffee beans then opt for one that allows you to stir the beans so they do not burn.
  • Store the roasted coffee beans for about 3-4 days before using them. This is to allow the levels of carbon dioxide and nitrogen gasses to decrease, to avoid a metallic flavor.
  • Use a quality green bean, before you become an expert coffee roaster you will need to find quality ingredients.

Summary

Home coffee roasting is fairly simple to achieve and a great inexpensive hobby and pass time!

Primarily it’s all about preference and finding the right roast for you, this is achieved by experimenting and practice.

There are many more resources available on the internet if you want to take your roasting to another level, but in the meantime, we hope this beginners guide to coffee roasting has been helpful and got you started!

If you can think of anything we have missed or perhaps have a question to ask then please leave a comment below and we will be sure to get back to you!

Coffee Roasting FAQ

How long does it take to roast coffee?

The length of time taken to roast coffee depends on what type of roast you are wanting to create from light to dark roast.

The darker the roast the more time it takes to roast coffee. It also depends on how you are roasting the coffee and what method you are using.

How long do the roasted coffee beans keep?

If you have followed my storage advice above and kept them in an opaque and airtight container in a cool and dark place then on average the beans will last around 3 weeks.

That being said if you are very careful with storage you may find your beans will last up to 6 weeks.

The beans can last longer, however, after time they will start to change or lose their flavor.

Can you roast coffee without a machine?

Yes, you certainly can you don’t need to invest in an expensive automated machine to roast coffee you can choose to use a skillet or the oven in the kitchen! These methods though are much harder to grasp, making it harder to get the perfect roast.

Can you re-roast coffee beans?

It is possible to re-roast coffee beans but I would strongly advise against it, the flavor will not be nice and you’ll end up with a kitchen full of smoke!

The Beginners Guide To Astral Projection

Astral Projection

What is Astral Projection?

Astral Projection is when your astral body detaches itself from your physical body, very similar to an outer body experience, and travels to the astral plane. The most common time it occurs is in a near death experience or during a serious illness. With practice and patience, it is possible for you to achieve astral projection on demand.Astral Projection

If you’ve recently seen the film “Dr Strange” then you will know that one of his primary superpowers is astral projection.

The art has been practised for centuries, especially in Ancient Egypt & Greece.

Beginners Astral Projection

If you have no experience and are just starting out in Astral Protection then you’ve come to the right place.

Before we teach you a method to reach the astral plane it’s best to know some basic information.

Please remember this article is the very basics and fundamentals and should be used as part of your research only. I am by no means an expert and have only just started out on my journey into Astral Projection.

For a more in depth book full of knowledge and guidance I highly recommend you read “The 90-day guide to Astral Projection

Dangers of Astral Projection

You should first be aware of any dangers.

These are few and far between but nothing comes without risk.

Mental & Physical Exhaustion

At times you can return from your Astral journey feeling mentally and even physically drained and exhausted. If you are not prepared for this and don’t fully understand why it can be very startling and scary and may even lead to a feeling of depression.

Addiction

Once you have mastered the art of Astral Projection it may leave you wanting to be on the Astral plane all the time. In extreme cases, people begin to care more about the Astral plane than they do their day to day lives. A healthy balance needs to be found.

Incorrect Grounding

Incorrect grounding can cause numerous problems in your life, for example, loss of concentration, bad social interaction and actual physical pain.

The physical pain is caused by your body trying to force you back into you it.

All of these dangers though that I have just written can be fully avoided with the correct knowledge and proper methods.

The Silver Cord

I believe knowledge of the silver cord is mandatory before you practice this ancient art.

The Silver Cord is the unseen cord that connects you to your physical body, stopping you from getting lost in the astral plane without a way to get back.

Knowledge of the Silver Cord can help get you back to your body on demand.

Protecting your Cord is important and fairly simple to achieve, you can do this by regularly meditating and cleansing your chakras.

How to Astral Project

So now you know some of the basics you want to know how to Astral Project!

As this is a beginners guide then I will keep the step by step guide very simple and clear. There are many more things you can do to help with the Astral projection which I will discuss later on in this article.

  1. Ensure that your environment is distraction free. Switching mobile phones to silent is a good idea, you’ll be amazed at how many times a message or call has distracted me from trying to project.
  2. Lie down on a comfortable surface this can be anything from your bed, your sofa, your floor. Wherever you feel most comfortable is perfect. A good tip is to also be wearing your “comfy clothes” these can be pyjamas, nightgowns or in your birthday suit if you prefer lol
  3. Contrary to popular belief you don’t want to be trying to fall asleep, your end goal is to let your body sleep but to keep your mind awake. Try to clear your mind and focus on breathing gently in and out, relax.
  4. You should now continue to relax until you start to feel tingles, these are what we call vibrations. It’s easy to lose focus and become excited when you feel these vibrations as they are a sign that you’re nearly there. Getting excited will stop you from your projection. Stay calm and continue to relax.
  5. After you begin to feel the vibrations (tingles) Keep your eyes closed, stay relaxed and then envision your astral body leaving your physical body. You should imagine that your astral body is rising up. Try to allow this thought part of the process to feel natural.
  6. At this point, you should begin to feel like you are rising upwards an almost floating feeling. If you do then you know that you are about to Astral Project. If you don’t then continue to relax and repeat step 5 again.
  7. This is the final step and this is where you should now be able to see your physical body lying where you left it. If you can congratulations your Astral journey is about to begin. Do not become scared, embrace the feeling and experience.

How to get back from the Astral Plane

A question I am often asked is how you get your Astral body back to your physical body when you want to leave the astral plane.

This is the tricky part and will take some practice.

At some point you may have already experienced astral projection, however, you may not recall any of it.

Remembering your experience is a huge part of visiting the astral plane especially if you want to reap all of the benefits that are associated with astral projection.

The key is to slowly reconnect.

When you are in an astral projection, your memories and experiences are not captured by your physical brain, they are captured by your extra-physical brain. What you need to do is to transfer this information.

A good technique is to repeat names, places and experiences out loud while on the astral plane. So if you meet someone while you are there then repeat their name out loud several times. You can do this with places and experiences too.

Some people before they begin astral projection like to use self-suggestion. This is a very simple yet powerful technique and is achieved by repeating a sentence such as “I will remember everything about my astral projection” you can repeat this 10 – 15 times. Saying it out loud will help. You should use self-suggestion after you are relaxed.

Before you return from your astral journey to connect with your physical body you should remember to approach this part slowly, don’t rush.

While returning you should be very focused on remembering your experiences.

Before jumping out of bed or waking up once you have reconnected lie for a few moments and try your hardest to remember your experiences.

This part of the reconnection and recollection will take some focus and practice don’t expect it to just happen. Be patient it’s worth it!

If you would like to see a beginners video on how to to Astral Project then check out the YouTube video below

What are the benefits of Astral Projection?


Reach other planes of reality

It is believed that Astral projection and the out of body experience allows us to reach other realities and dimensions. This, of course, opens up endless possibilities on where we can travel and what we can see. Many have said they have seen the place we go after we die, and some also believe they have visited their previous lifetimes.

Speaking to passed loved ones

There are many reports of people who have mastered the art of astral projection and then visiting loved ones that have passed away and even being able to talk to them!

I must say this sounds like very advanced astral projection so don’t expect to get there just yet it may take years and years of projection and practice.

Understanding and dealing with loss or death

Once we have experienced astral projection and the OBE you will realise that death is non-existent! While in the astral plane you will exist away from your human shell.

As your astral projection skills advance the fear of death starts to subside as you grasp the concept of death not existing.

Memories or recollection of a past life

The more you astral project the more you will have recollections of your previous lives. These experiences and memories give us more information about ourselves, give us a greater knowledge of universalism and can help us overcome trauma and in some cases self-cure illness.

Increased parapsychic abilities

The Astral projection experience can help expand our psychic capabilities and extrasensory perceptions.

Speed up maturity and awakening 

Visiting the astral plane leaves our bodies in a physical state of sleep, but our minds are fully awake. You avoid the loss of sleeping time and can still learn. You will use that time where usually your mind, as well as your body, would be asleep to increase knowledge and experience.

Both your spirit and maturity will naturally evolve.

If you’re ready to start your astral projection journey then be sure to take a look at these 5 simple tips for astral projection.

Astral Projection FAQ

Is sleep paralysis related to Astral Projection?

I personally have experienced sleep paralysis, I remember the first time being a little scary and overwhelming, that much so that I had to research the condition to be prepared for if it happens again. According to research sleep paralysis is the perfect time for astral projection. Sleep paralysis puts you in a state where your astral body is able to detach from your physical body much more easily.

Is Astral Projection Safe?

Astral Projection is safe, well as safe as being asleep in your bed. You still are at risk from anyone hurting your physical body. It is not possible for anyone to hurt your Astral body.

There are many myths surrounding Astral projection including getting lost and your physical body being open for possession.

Can you Astral Project While Awake?

When you Astral Project you are awake, well at least your mind is. This is a big part of the process and the hard part to master. Keeping your mind awake while letting your body sleep is key.

What is the difference between Lucid Dreaming & Astral Projection?

Lucid dreaming is not real, Astral Projection is, however, a real experience.

To help me explain this question I will need to show you the key differences.

Lucid dreaming – You are asleep, you are in complete control and this experience is not real it is a dream. You completely control the surroundings, the people, the outcome and the experience. You can completely manipulate every aspect of your dream while lucid dreaming and your consciousness is still attached to your physical body.

Astral Projection – To achieve astral projection you can’t be sleeping. Astral projection will happen just before the first stage of sleep, so therefore this is a real experience. You have no control over the aspects of astral projection. Your consciousness will leave your physical body and travel to the astral plane. The only thing you have minor control over is conversations and interactions. When your astral projection experience is complete your consciousness will rejoin with your physical body.

How long will it take for me to be able to Astrally Project?

This really is not a question you should be asking, it’s not something you will get right the first time. Astral projection takes dedication, devotion, time and a lot of practice.

Before you master Astral Projection you need to understand each aspect and stage.

It is not possible to tell anyone how long it will take you to learn as each person is completely different. Instead of wanting to learn overnight try to find enjoyment in the process of learning.

What are the benefits of Astral Projection?

The main benefit of Astral Projection is peace of mind and a spiritual sense of healing and well being. You may also find the experience exciting and magical.

Recommended Astral Projection Links & Extra Reading

90 Day Guide To Astral Projection

Cleansing the 7 Chakras

Beginners Meditation

Beginners Guide To Ghost Hunting

Beginners Ghost Hunting

What is Ghost Hunting?

Ghost hunting is an adventurous hobby or pastime, and sometimes even a career choice. It involves investigating locations that are said to be haunted.

The main objective is to gather evidence and support to the existence of the ghost or ghosts and other paranormal going on’s.

Some people choose to ghost hunt with just a camera and no other devices and do it for the thrill. Others are more serious about the hobby and will use a variety of electronic equipment.

Ghost hunting became increasingly popular with the creation of the TV Programs such as “Ghost Hunters” and “Most Haunted”

It can be a very fun, enjoyable and interesting hobby and we hope this ghost hunting beginners guide gives you enough information to get started.

Check out this video of paranormal sightings.


A Brief history

Ghost hunting, more specifically paranormal investigations, are found to date back to around the 18th century.

I imagine though that ghost hunting has been going on for centuries though and as long as people have believed in the paranormal and spirits.

The hobby increased largely in popularity when the TV series Ghost Hunters and Most haunted aired.

Common Terminology

The Afterlife: The place you go after you die. Life after death.

Anomaly: Something out of the ordinary which can’t be explained.

Apparition: A ghost-like image of a person, an unexpected sight.

Cold Spots: Areas in a location that feel cold, often associated with a spiritual presence.

Ectoplasm: A strange substance that can be emitted by spirits when communicating.

EMF: Electromagnetic Field or Electromagnetic Frequency,  EMF fields are used to determine spiritual presence. Measuring the change in electromagnetic fields.

Entity: A spirit or ghost and sometimes even a person.

EVP: Electronic Voice Phenomena is the act of capturing voices and sounds from the spirit world.

Exorcism: The spiritual and religious practice of expelling a spirit or demons from a possessed person.

Ghost: A Spirit that wanders our world often after their human shell dies.

Ghost Hunters: A person or people who conduct investigations into the paranormal to try and prove the existence of spirits.

Ghost Lights: Sometimes also known as orbs, strange lights that appear as colourful spheres.

Haunting/Haunted: A location where there appears to be paranormal or spiritual activity.

Medium: A person who acts as a medium between this world and the spirit world, someone who communicates with ghosts.

Orbs: Mostly in the shape of a sphere, a translucent white coloured light, sometimes slightly tinged that appear in photos.

Paranormal: Something that defies scientific explanation, a term often used to describe ghosts, UFO’s and other unexplained things from outside of what we call normal.

Physical Manipulation: When A physical object is moved by a ghost without human interference.

PK: Also known as Telekinesis and Psychokineses

Poltergeist:  A mischievous or bad spirit who make a lot of noise and can move things with ease.

Portal: A spiritual doorway through which spirits enter and exit the location.

Possession: When a person, or even inanimate object, is taken over by a ghost and they then control the person or it.

Residual Energy: When an emotional event leaves residue from energy on objects or locations, these hauntings and residue will often repeat a single event over and over again.

Séance: A gathering of a few individuals with the purpose of making contact with the spirit of a deceased loved one or other spirit.

Spirit: A soul of an individual who has passed on to the afterlife but continues to be observed in spirit for in a specific location.

Vortex: The centre of spiritual energy.

Where can I go Ghost hunting?

Ghost Hunting Locations

The best thing about ghost hunting is there are a vast amount of places you can go as long as you can get permission.

There are also many organisations that arrange trips and outings if you are lazy and don’t want to look for your own ghosts.

Some ideas of places you can go ghost hunting are:

Abandoned buildings

Don’t be fooled by the age of a building either, just because the building is new does not mean that the land does not have a history.

Historic buildings

Over time many historic buildings have gained more spirits attached to it, a lot of historic buildings are also open to the public giving you a great first place to start. Lots of historic buildings have had ghost sitings and hauntings. Doing your research and asking members of staff will help you get started.

Previous Sitings

A great place to start is to visit sites where there have been ghost sitings, there’s already evidence to suggest that there is a paranormal presence. You can use the internet and social media groups to research these sites and if you can find the people who have seen the supernatural, then you can gather more information by talking with them.

Woods and Forests

Over the years forests and woods have been largely associated with the paranormal and many are said to be haunted. I’m not sure why woods and forests have become so popular with ghost sitings. Before heading down to the woods nearby research first, try to look for ancient woods and not new forest land.

Cemeteries

There are many reasons why cemeteries are a good place to go ghost hunting before you begin though remember that you should respect where you are don’t go trampling on peoples graves.

It has been said that spirits are drawn to their former bodies and that cemeteries can be portals to the other side.

Organised events

Organised events are the perfect place to start ghost hunting and to get a feel for whether you will pursue this hobby more seriously. The research has been done for you and you already have permission. It’s a great place to meet like-minded individuals and pick up some advice.

Ghost Hunt Location research

Once you are decided upon your location its time to use Google and other literature to do some more in-depth research.

This research will help you figure out if you will first need permission from the proprietor if you’ll need a ghost hunting team and what equipment you will need to take on your trip.

You can perform Google searches, visit your library, talk to the locals nearby the haunted location, and speak to other people who have been to the place that is reported as haunted.

Another great way of researching is in newspaper archives.

Planning is very important at this stage, you’ll need to know what times the ghosts were seen, Where the ghosts were spotted, the history of the location and more.

All of this information will lower the chance of you having a wasted hunt!

The research stage of ghost hunting can be just as exciting as the actual hunt, it builds anticipation and can be very educational.

Before you go

Ghost hunting safety

Before you venture out on your first ghost hunting trip you will need to know a little more about the dangers and safety measures to prevent them. The last thing we want is for you to harm yourselves.

So here are a few ghost hunting safety tips to ensure you are prepared for what lies ahead.

  1. Visit the location in the light
    Your ghost hunting should take place at night, however, you should plan a visit beforehand in the light. This will allow you to check the property or location so you can plan an emergency exit should you need to, check for damage and other potential risks and hazards.
  2. Go with friends or a team
    Going ghost hunting alone is a bad idea, having a team or some friends with you will help keep you safe in case of an emergency.
  3. Take a safety kit
    I’ve listed the components of this ghost hunting safety kit in the next section. Having this kit with you at all times will protect you in case of an emergency.

Ghost Hunting Equipment

Ghost Hunting Equipment
Image Source: https://www.ghosthuntingsource.com/

The equipment you use depends entirely on how serious you want your ghost hunting hobby to become.

The best thing about ghost hunting for me is it’s a great pastime for all budgets. It’s a good idea to first have a few outings with a minimal amount of ghost hunting equipment so you can decide whether the hobby is for you before spending money on the more serious tools.

Here’s a quick list of the equipment you will need and some extras should your ghost hunting hobby budget allow you to.

Ghost hunting equipment list 

Ghost hunting safety kit (mandatory)

The ghost hunting safety kit is made up of a few components.

I believe safety is very important when hunting and this kit could potentially save your life or at the very least save you from injury.

First get yourself a backpack and put in a first aid kit, food and water, a mobile phone, extra layers of clothing, rope and some spare batteries for your flashlight. If you are on any kind of medication or suffer from asthma ensure you take what you need with you.

Flashlight (Mandatory)

You will definitely need a flashlight, this is paramount for your safety.
When ghost hunting you will be in dark places, which could be part derelict, this means you can’t see trip hazards and potential danger. You can get great LED torches and flashlights now at a very small cost.

Make sure you also have some backup batteries, buy rechargeable batteries this will save you money in the long run!

Check out this rechargeable tactical flashlight (Check price on Amazon)

Paper & Pen (Mandatory)

Some paper and a pen or preferably a notebook or journal dedicated to recording your experiences as and when they happen.

Some people also try a technique called automatic writing when they are out ghost hunting. You can see more about the automatic writing technique and how you can do it here.

A Camera (Mandatory)

If you can’t afford to have a professional camera then the one on your phone device will suffice. That being said anyone who wants to take the hobby more seriously will want to have a range of different cameras.

With digital editing and manipulation available it’s hard to even have a picture as proof these days.

If you can afford it a DSLR camera and a Polaroid or film camera, it will allow you to take pictures in 2 different ways giving you harder evidence.

Thermometer (optional)

It is believed by many that when you are in the presence of ghosts or other paranormal entities that the temperature will drop and be rather cold.

A good digital thermometer will allow you to test temperatures of locations and areas helping you find the cold spots.

EMF device (optional)

EMF detectors measure the change in electromagnetic fields and it is widely believed that ghosts and the spirit world will alter the electromagnetic field surrounding you while in their presence.

You can’t rely solely on an EMF device as proof but it’s a great bit of kit to have in your ghost hunting arsenal and will allow you to take the hobby to another level.

Check out the Ghost Augustine K2 EMF Meter. Great reviews, simple for beginners to use and most importantly it works fantastic!

Audio Recorder (optional)

EVP stands for Electronic Voice Phenomena and is a standard process that ghost hunters use when out ghost hunting, the goal is to capture audio with paranormal sounds or even voices.

Again depending on your budget will depend on what kind of audio equipment you purchase. A digital recorder or cassette recorder will suffice, but you can go as far as high tech equipment with external microphones if you want to take the hobby more seriously.

You can pick digital audio recorders up for a great price!

Your first trip ghost hunting!

So you’ve got your equipment, you’ve done your research and you have your location and permission. What do you do now?

Before anything, you should have visited the site in the daylight and planned your safety regime. This is very important.

If you are going at night and won’t be getting back until late then make sure you are well rested and if possible have a nap before, this will make sure you are alert and ready for what lies ahead.

Pack your equipment and check that you have everything needed, check it twice!

When arriving at your location you should check your digital equipment and turn on the time and date stamp on both your video recorder and your photo equipment this will make analysing your findings much simpler.

Before entering some people like to say a little prayer as a form of protection to stop spirits from attaching themselves to you or your equipment.

Pre Investigation Prayer

Heavenly Father, God of the Universe,

We all come to you in prayer tonight for our protection.

Please protect our bodies, souls, equipment, and all personal possessions from any harm.

We ask that You send your angels to guard us against all evil and malevolent spirits and protect us with Your white light.

We give permission to Your Angels to intervene for us on our behalf.

We pray that You allow the spirits to show themselves to us and allow us to obtain evidence of their existence.

Lord, let our endeavours tonight, not be in vain.

Please allow us to have a safe and eventful investigation tonight.

We pray that no spirit or ghost, of evil will or intention, be allowed to attach themselves to any of us or our belongings and that they not be allowed to follow us to our homes or enter therein.

We pray Lord that You also protect all of our fellow paranormal investigators from any harm tonight and allow us all a safe journey to our homes.

We pray these things in the name of the Father, the Son (Jesus Christ), and the Holy Spirit. Amen

Your first ghost hunting trip continued…

You’re now ready to enter the location with the team and your equipment!

Once you are inside don’t get excited and go running around, make a plan and visit each room. While you are in each room thoroughly investigate and take lots of pictures, video and recordings.

Ask politely if anyone is there and to give you a sign of their presence. Talk to the spirit world like you would talk to a friend, be polite and friendly.

If you have more advanced equipment like EMF readers then be sure to make use of them and record the meter readings in each area of the location you visit.

Make a note of anything that could interfere with the EMF reader, anything electrical. Things like sockets, lights and switches can all cause shifts in the EMF.

For the purpose of photography and video, you should also look for objects that may cause a reflection or glare. You may want to cover shiny surfaces where possible to avoid any reflections in pictures or video which could interfere with your investigation.

Follow your gut feelings while in the house and try to clear your mind as much as possible, take pictures even in places you aren’t looking directly at, point the camera wherever you feel the need to.

Continue your ghost hunt throughout the whole of the location covering every accessible area if somewhere is too dangerous to get to which may pose a risk to your safety and cause injury then do not attempt to enter.

Have respect for the location and leave it exactly as you found it.

When your paranormal investigation has concluded you should gather together and say another prayer of protection.

Concluding the investigation Prayer

In the name of Jesus Christ, I command all spirits to not follow any of us home or attempt to bind to us personally.

God bless you and may you find peace and love in the Lord and in the afterlife and be free to move on to the next plane of existence as God wills.

I hereby command all demons and inhuman spirits to go where Jesus Christ tells you to go, for it is he who commands you. 

Amen.

Beginners Tips for Ghost Hunting

  1. Don’t go ghost hunting alone, you should take a friend or go with a group it’s always good to have extra ears and eyes and to confirm any sightings. It’s paramount for your safety too!
  2. Research, get permission and do not trespass. You should carry some form of identification with you and if you can a letter granting you permission.
  3. Talk to the ghosts as you would talk to a living person. Be polite, ask questions, ask for their permission to take photographs and video, remember before you leave to thank them and say goodbye.
  4. Be respectful not only to the location owner by leaving the location as you found it but also to the spirits. Don’t charge in running around and being loud disrupting their home.
  5. Prayers and Wards some people like to say a prayer of protection before entering the location, others also where religious wards and protection.
  6. Take lots of pictures and video footage, whenever you feel like it. If your gut tells you to take a photo in a certain direction then do so, take pictures in places that you aren’t even looking in. The more pictures and video the better. Also, make sure you have your spare batteries and you have plenty of storage space on your device.

Analysing your investigation data

Once you’ve been on your ghost hunting trip and recorded your data and evidence it’s time to analyse.

You should have at this point media like photographs, video, audio and perhaps even wrote some notes.

Firstly you will want to find a quiet place away from distractions, layout your evidence and findings in front of you and take your time to review everything and if you can grab a friend to help or even one of the ghost hunting team who went with you that will help a lot. Two sets of eyes are better than one!

You will want to transfer any digital media to your PC or laptop and if you have had film photos printed then organise these in front of you.

Digital Photographs

For analysing photos you will need a graphics program installed. A good free graphics program is Gimp.

You can use the zoom magnifying feature to zoom right in on your photos and the manipulation features to adjust and fine-tune brightness, contrast, saturation and more.

Be sure to examine each part of every photo as you never know where orbs or anomalies will show up.

Digital Video

Video footage will be the hardest part to examine and can be very tiring and hard on your eyes. It’s better to analyse the video footage in shorter sessions.

If you see anything out of the ordinary jot down the time so you can easily return to double check with fresh eyes.

To edit and view video footage you can use AVS video editor it’s completely free. This program will also allow you to cut snippets from the full video file an save separately.

Digital Audio

To begin with, you will need the software for editing and listening to your digital audio. Audacity is one of the best free audio editors and analysers available.

At this point, you’re going to want to plug your headphones in, preferably ones that block out any background noise allowing you to hear any suspected EVP’s. Again if you hear anything out of the ordinary, jot down the time of the audio.

With audacity it allows you to cut sections from the big audio file, it will also allow you to finetune by removing background noise and can enhance audio.

Cross Checking Your Media

If you think you have found something then it’s time to cross check the other media.

So for example perhaps you think you heard an EVP on your audio file, you noted the time, so now skip to the same time on the video and re-analyse to check to see if there is anything out of the ordinary on the video footage.

If you have a photo of something, then again you can skip to the same time in the video or in the audio.

Tip – Always ensure you have time and date stamps switched on in your camera and video camera before going on a hunt.

Analysing the media data is the longest and hardest part of ghost hunting, it can be very tiring. Don’t rush and if you start to feel too tired come back to it another day, you don’t want to run the risk of missing anything because you are fatigued and tired.

Create a folder on your computer with the time, date and location of each ghost hunt so you can revisit your evidence.

Summary

Ghost hunting can be exciting and educational not to mention exciting in a terrifying way! Always remember to stay safe don’t take silly risks and plan your outings. I would love to hear from you all, ghost stories, sightings or maybe you have some advice for our beginners. Be sure to leave a comment and happy ghost hunting!

Ghost Hunting FAQ

Is Ghost Hunting Safe?

Generally speaking yes it is safe, your biggest risk is injuring yourself in the dark. As long as you are responsible and you use your common sense and the safety tips I’ve listed above you should be very safe. Don’t go ghost hunting if you have heart conditions or such like!

Are Ghosts Actually Real?

Isn’t that the whole point of this hobby and why you are interested? To prove that they are!

There have been millions of sitings and many unexplained videos and photo evidence it’s hard to believe that there isn’t such thing as ghosts. This question will always be debated. I believe!

Where can I go ghost hunting near me?

You can go to many places as long as you have permission to be there, use your imagination, old buildings, previous sitings, historic places etc you can even go on an organised ghost hunt with other like-minded people. To find a ghost hunt near you, go to Google and type “Ghost hunt” followed by “your locality”

Useful Ghost Hunting Links & Resources

Ghost & Paranormal Forum